
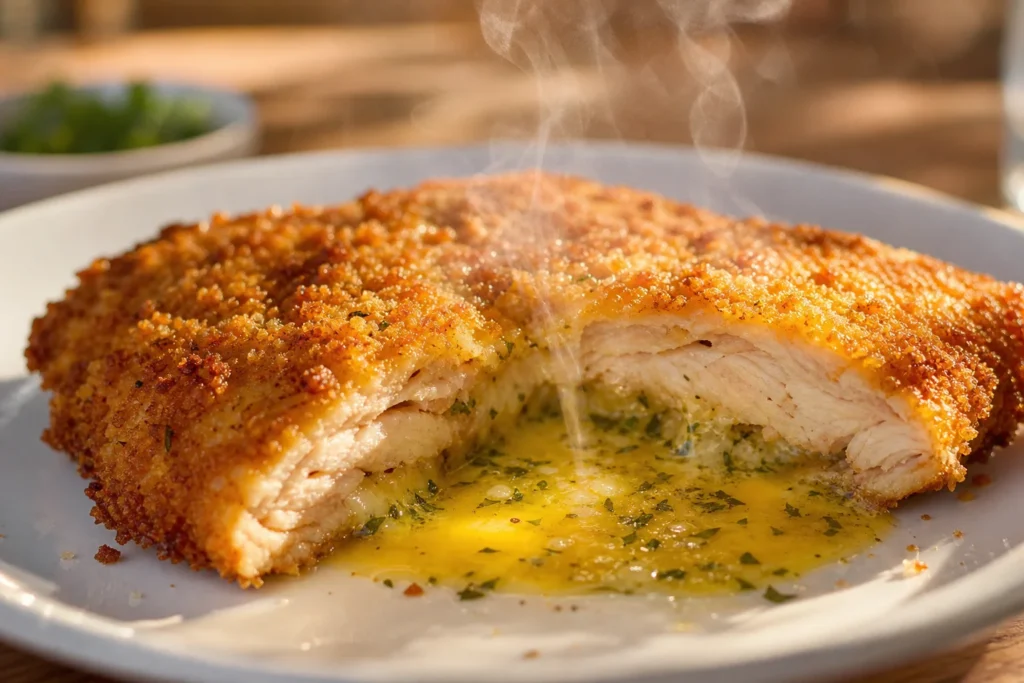
Chicken Kiev is one of the classic dishes of Russian and Ukrainian cuisine, found on tables from home kitchens to restaurant menus across the region. This guide is for anyone who wants to understand what the dish is, how to make it at home, and what to expect when you serve it or order it in Russia.
The beauty of Chicken Kiev recipe lies in the contrast: crisp, golden breadcrumb coating outside and a warm cascade of herb butter inside. The recommended approach is to prepare the herb butter ahead, then assemble and cook the cutlets shortly before serving. Total time is about 45 minutes to an hour when made fresh.
Quick answer: Pound boneless chicken breasts thin, fill each with a piece of cold herb-and-garlic butter, roll and seal, coat in flour-egg-breadcrumbs, then shallow-fry or deep-fry until golden brown. Takes 40–50 minutes total including freezing time for the butter.
At a Glance
| Type | Dishes |
|---|---|
| Local name | Котлета по-киевски |
| Origin | Chicken Kiev, despite its name, is a Russian invention created in 1912 to satisfy wealthy patrons of St. Petersburg's Club of Russian Merchants. The recipe was later rediscovered in 1947 and prepared for Ukrainian diplomats, then fried on Kiev's Kreshchatik street under the new name Kotlety po-Kievsky. Since the 18th century, Russian chefs had adopted French haute cuisine techniques, a practice furthered by French chefs like Marie-Antoine Carême hired by Russian gentry, and the use of high-quality meat cuts such as cutlets became widespread in the 19th century. |
| Servings | 2–4 servings (4 cutlets) |
| Total time | 40–50 minutes including prep and freezing |
| Difficulty | Medium |
History and Story of Chicken Kiev, Volgograd
By the mid-20th century, Chicken Kiev had become standard fare at Intourist restaurants catering to foreign visitors. The dish gained renown despite the inherent hazard of eating it: the hot butter sealed inside can easily squirt out and spatter the diner’s clothes. By the 1970s, Chicken Kiev had become commonplace in Russia and could be purchased ready-to-cook at different food outlets.
Ingredients
- 2 boneless, skinless chicken breasts
- 90 g unsalted butter, softened
- 2 cloves garlic, minced
- 30 g fresh parsley, finely chopped
- 15 g fresh dill, finely chopped (optional)
- 100 g all-purpose flour
- 2 eggs
- 150 g breadcrumbs or panko
- Salt and pepper to taste
- Oil for frying (vegetable or canola)
How Chicken Kiev, Volgograd Is Made
Step 1: Prepare the herb butter
Mix softened butter with minced garlic, chopped parsley, dill, salt and pepper in a bowl until well combined. Form into a log shape or cylinder, wrap in foil or plastic wrap, and place in the freezer for at least 20 minutes until very firm. You need the butter cold and solid so it does not leak during cooking.
Tip: Freezing the butter log beforehand is essential; it should be hard enough that you can cut clean pieces from it.
Step 2: Pound the chicken breasts
Place each chicken breast between two sheets of plastic wrap or in a sealed bag. Using a meat mallet or the bottom of a heavy pan, pound the chicken gently and evenly until it is about 1/4 inch (6 mm) thick. Pat dry with paper towels and season lightly with salt and pepper on both sides.
Tip: Consistent thickness ensures even cooking and prevents the filling from escaping.
Step 3: Add the butter filling
Remove the frozen butter from the freezer and cut it into small pieces or thin strips. Place one piece in the center of each flattened chicken breast. Fold in the sides first, then roll the chicken tightly from one end to the other, like a burrito. The edges should overlap and seal completely so no butter can escape.
Tip: Work quickly so the butter does not soften. If it begins to warm, return it to the freezer for a few minutes.
Step 4: Set up the breading station
Place flour in one shallow dish, beaten eggs in a second dish, and breadcrumbs mixed with a pinch of salt and pepper in a third. Arrange them in a row so you can coat each roll in sequence without any backtracking.
Tip: Panko breadcrumbs create a crunchier crust than regular breadcrumbs.
Step 5: Coat the rolls
Working with one roll at a time, coat it lightly in flour, shaking off excess. Dip into beaten egg to coat all sides. Finally, roll in breadcrumbs, pressing gently so they adhere. Place the finished roll on a plate. Let coated rolls rest in the refrigerator for 10–15 minutes before frying to help the coating set.
Tip: Make sure all edges are sealed with breadcrumb coating; any gap will let butter leak out.
Step 6: Fry the chicken
Heat oil in a large, heavy skillet over medium-high heat (or prepare a deep fryer at 350°F/175°C). When oil is hot, carefully place the breaded rolls into the hot oil. Shallow-fry for 4–5 minutes on each side, turning once, until golden brown and crispy. Do not move them around excessively; let them develop a crust. Alternatively, deep-fry for 5–6 minutes total, turning halfway through.
Tip: Keep the oil hot but not smoking. If it is too cool, the coating will absorb oil and become greasy; if too hot, it will burn before the chicken cooks through.
Step 7: Finish cooking (optional baking method)
For a lighter result, shallow-fry the rolls in a skillet for 3–4 minutes until light golden, then transfer to a preheated 375°F (190°C) oven for 8–10 minutes to finish cooking through and ensure the butter inside is hot. This hybrid method reduces oil absorption while ensuring a fully cooked cutlet.
Tip: An instant-read meat thermometer inserted into the thickest part should read 165°F (74°C).
Variants
- With sun-dried tomato or pesto mixed into the butter
- Using different fresh herbs: tarragon, chervil, or chives instead of parsley
- Baked version: shallow-fry then finish in the oven instead of deep-frying
- Stuffed with both butter and a thin slice of ham or smoked salmon
- Served with a light lemon-wine sauce instead of just the melted butter
Common Mistakes to Avoid
- Not freezing the butter filling hard enough. If the butter is warm or soft, it leaks out during cooking and ruins the appearance and flavor.
- Pounding the chicken unevenly. Thick spots cook more slowly, while thin spots overcook and toughen. Aim for uniform 1/4-inch thickness.
- Leaving gaps or unsealed edges in the roll. Butter will escape through any opening, so fold and seal carefully.
- Cooking at too low a temperature. The coating must fry quickly enough to set and become crispy before the coating absorbs excess oil.
- Moving the rolls around too much while frying. Resist the urge to flip constantly; let each side develop a golden crust undisturbed.
- Skipping the rest period after breading. Allowing 10–15 minutes in the refrigerator helps the coating adhere securely.
How to Order and Eat It
Chicken Kiev is best served hot, immediately after cooking, while the butter inside is still melted and warm. Place on a plate and let it rest for 1–2 minutes. Using a fork and knife, make a small cut into the thickest part of the roll and allow the hot butter to escape slowly onto the plate—it serves as both sauce and flavoring. Eat with mashed potatoes, boiled rice, or a light salad. The traditional Russian way is to pierce the cutlet gently with a fork so the butter flows out slowly rather than spattering.
To order: Котлета по-киевски, пожалуйста [Kotleta po-kievski, pozhaluysta]
Diet and Allergens
- Contains gluten
- Contains eggs
- Contains dairy
Russia Vibes Tips
- Make herb butter the day before and freeze it. This simplifies assembly on the day you cook.
- Use the widest chicken breasts you can find; they are easier to pound thin without tearing and hold more filling.
- Wear an apron and be cautious when cutting into the finished cutlet. The butter inside is scalding hot and will escape with force.
- If the roll opens or the coating cracks before cooking, seal it immediately with a small pinch of extra breadcrumb batter so the filling does not leak.
- For a less rich version, substitute part of the butter with Greek yogurt mixed with herbs, though this changes the authentic flavor.
Explore Nearby Chicken Kiev, Volgograd
Browse more: All Food & Drink · All Food & Drink in Volgograd · All Other · All Volgograd
FAQ
Can I make Chicken Kiev ahead and freeze it?
Yes. Prepare and coat the rolls, then freeze them uncooked on a tray for 2 hours until solid, then store in a freezer bag for up to 3 weeks. Fry from frozen, adding 2–3 minutes extra cooking time. Do not thaw before cooking or the butter will leak out.
Why does the butter leak out during cooking?
Butter leaks because the roll was not sealed properly, the filling was not cold enough before cooking, or the oil temperature was too low. The coating must set quickly; if oil is too cool, the bread absorbs heat before sealing, and butter escapes. Ensure proper folding and keep oil at 350°F (175°C) or higher.
Can I use a different herb than parsley?
Yes. Dill, chives, tarragon, or chervil all work well. Use about the same total volume of fresh herbs. Avoid strong herbs like rosemary or thyme in large quantities, as they can overpower the delicate chicken.
Is Chicken Kiev served with a sauce?
Traditionally, the melted herb butter that escapes when you cut into the roll serves as the sauce. Some restaurants offer a light lemon-butter or mushroom sauce on the side, but it is optional. Mashed potatoes or rice absorb the butter beautifully.
How do I know when it is cooked through?
The chicken is done when the coating is deep golden brown and an instant-read thermometer inserted into the thickest part (avoiding the butter pocket) reads 165°F (74°C). The meat should no longer be pink inside.
Can I bake it instead of frying?
Baking alone produces a softer, less golden coating. The best approach is to shallow-fry for 3–4 minutes to develop color and seal the coating, then finish in a 375°F (190°C) oven for 8–10 minutes. This hybrid method reduces oil while keeping the coating crispy.
What if I do not have panko breadcrumbs?
Regular fine breadcrumbs work fine; the coating will be slightly less crunchy but still delicious. You can also crush crackers or toast breadcrumbs in a dry pan for a coarser texture.
How do I prevent the chicken from drying out?
Pound it to even thickness, do not overcook (165°F internal temperature is sufficient), and do not skip the butter filling—it keeps the meat moist. The herb butter melting inside is key to a juicy result.
Russia Vibes is a one-person project. A coffee keeps it going
How we research and update our guides
About this guide: AI assistance and accuracy
This guide is created with the help of AI and is based on official sources where available. Mistakes can still happen. Opening hours, prices, rules and other details are given to the best of our knowledge as of the date shown and can change without notice. It offers general recommendations only, not professional, legal or travel advice. Please confirm important details with the official source before you travel; you are responsible for your own plans and decisions.

Take this guide with you
Get a free PDF of this guide to print or read offline: key facts, tips and a map link on a few clean pages.
Report an issue on this page
Paying for your trip: please read
International sanctions affect payments between Russia and many other countries. In practice, cards issued in the EU, the UK, the US and several other countries often do not work in Russia, Russian cards usually do not work abroad, and some booking platforms, airlines and payment providers limit or suspend their services for Russia. The situation changes frequently.
We do not give legal or financial advice, and this site does not encourage anyone to break or circumvent sanctions. Whatever you plan, you are responsible for following the laws and regulations that apply to you, including those of your country of residence and citizenship.
Many travelers still organise their stay lawfully. It is worth asking your bank or payment provider what is currently permitted, contacting hotels, tour operators and carriers directly about the payment methods they accept, and checking which services are open to customers from your country. Clarify payment, cancellation and refund terms before you commit to a booking, and keep your plans flexible.
Partner links on this site may not be available in every country, and prices, availability and rules in our guides can differ from what you see when you book.